Here is a complete guide to taking care of your Lifesaver Cactus. The Lifesaver Cactus, formally known as Huernia zebrina, is a favorite among succulent fans because to its eye-catching look and low maintenance requirements.
Everything you need to know to keep your Lifesaver Cactus healthy and vibrant will be covered in this comprehensive guide, from propagation methods and frequent problems to ideal growth conditions. Come along as we set out to discover the mysteries of caring for this fascinating plant.
About Lifesaver Cactus
The Lifesaver Cactus, also known as the Lifebuoy Huernia, Little Owl Eyes, Owl Eyes, Zebra-Striped Huernia, or Carrion Flower, has the botanical name Huernia zebrina. Belonging to the Apocynaceae family, this perennial plant exhibits a compact growth habit, reaching approximately 6 inches wide and 6 to 8 inches tall at maturity.
Thriving in environments with full sun to partial shade exposure, the Lifesaver Cactus prefers to be planted in a cactus potting mix, reflecting its adaptation to arid conditions. It favors acidic soil, with a pH level conducive to its growth requirements.
During the spring and summer months, this unique plant blooms with striking cream-colored and red flowers, adding a splash of color to its surroundings. Originating from Southern Africa, the Lifesaver Cactus is native to this region and thrives in climates corresponding to USDA hardiness zones 9b to 11.
With its distinctive appearance and manageable size, the Lifesaver Cactus makes an excellent addition to succulent gardens, rockeries, or as a potted specimen, delighting gardeners with its charming blooms and intriguing foliage.
Characteristics of Lifesaver Cactus Flower
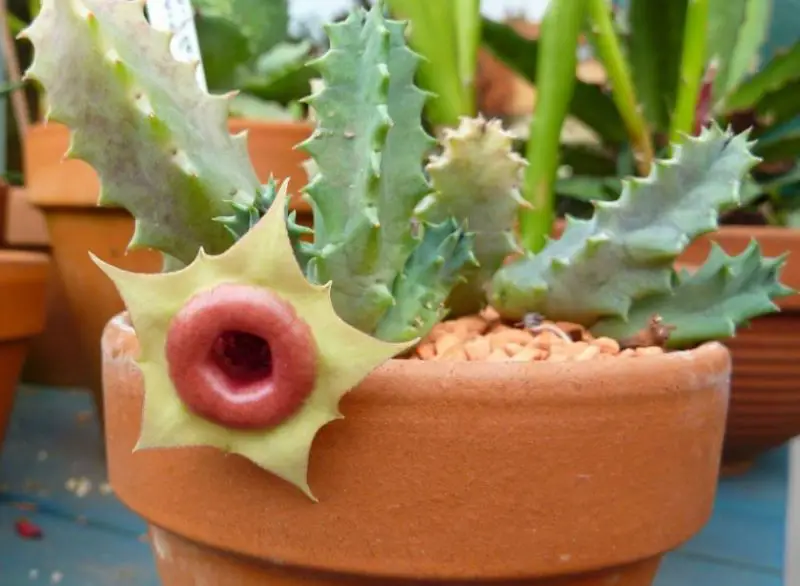
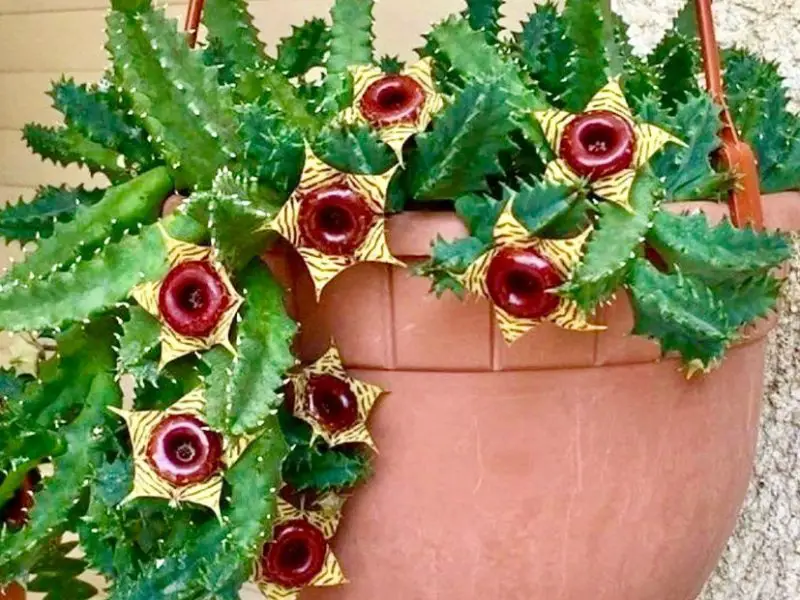
The blooms of Lifesaver plants are truly remarkable, featuring star-like shapes with five points adorned with zebra stripes and a thickened center reminiscent of a root beer-flavored Lifesaver candy. Besides, these flowers exhibit intriguing four-sided stems with soft teeth along the edges.
However, it’s important to note a distinct aspect: the Lifesaver Cactus Flower, generously produced from late spring through summer, emits a potent odor. While unpleasant to the human nose, this scent is nature’s design to attract pollinators. Often likened to the smell of carrion, the decaying flesh of dead animals, it’s no wonder this flower has earned the alternative moniker, carrion flower.
Lifesaver Cactus Care
The Lifesaver Cactus is an excellent choice for indoor gardening, particularly suited for compact living spaces. Its growth can be easily controlled by the size of the pot, making it perfect for small areas or even dish gardens. Key care instructions include using well-draining soil, placing it in partial shade to prevent sunburn, and watering only when the soil is dry to the touch, ensuring optimal growth and health.
Light
Lifesaver Cactus thrives when provided with the appropriate amount of light, reflecting its natural habitat as an understory plant in southern Africa.
For optimal growth, place the plant near an eastern- or western-facing window to ensure it receives partial shade. Exposure to direct midday sun and excessive heat, typical of a southern exposure, can cause stress and increase susceptibility to diseases.
The amount of light affects the appearance of the plant’s thick, angular stems with soft spikes. In low light conditions, these stems remain deep green, while exposure to strong sunlight results in a reddish hue. Adjusting light levels accordingly can help maintain the health and vibrancy of the plant.
Soil
Selecting the appropriate soil is essential for the successful cultivation of Lifesaver Cactus. It’s imperative that both the soil and the pot offer excellent drainage.
Opt for unglazed pots as they facilitate the evaporation of excess moisture, preventing waterlogging.
For the soil, utilize a specialized cactus or succulent potting mix. These mixes typically comprise a blend of inorganic components like sand and perlite, along with organic matter, ensuring fast drainage and optimal growing conditions for the plant.
Water
Similar to other succulents, proper watering is essential for the Lifesaver Cactus as it prefers minimal moisture.
Throughout the growing season, typically from April or May through the summer, it’s crucial to water the plant when the top inch of soil feels dry to the touch. Ensure slow watering until water drains out of the bottom of the pot, then promptly discard any excess water from the saucer. Wait until the soil dries out again before watering, especially during hot summer days when moisture evaporates quickly.
During the winter, the plant enters a dormant phase and requires minimal watering, typically once a month or as needed to prevent complete soil dryness.
Temperature and Humidity
While the Lifesaver Cactus is sensitive to frost, it can be safely relocated to your patio or porch during the summer season. However, it’s essential to ensure that it’s placed in a location sheltered from the intense midday sun to prevent sunburn. Additionally, keep in mind that outdoor conditions may cause the soil to dry out more rapidly, necessitating adjustments to your watering schedule to maintain optimal moisture levels.
Fertilizer
Once you begin watering the plant more frequently in spring at the onset of the growing season, it’s advisable to fertilize it monthly. You can opt for either a specialized liquid succulent plant food or a complete granular fertilizer, applying half the recommended dosage indicated on the product label.
Avoid adding any additional fertilizer starting from late August as the plant begins to enter dormancy. This cessation ensures that the plant can naturally transition into its dormant phase without excess nutrient stimulation.
Diseases And Pests
Mealybugs are a common pest that can affect the Lifesaver Cactus. Additionally, root rot and stem rot may occur, especially when the plant is under stress, such as from overwatering.
Stem rot typically appears as soft, dark spots on the plant. If you notice any affected areas, it’s important to promptly remove them using a sharp blade. Between each cut, ensure to sterilize the blade by cleaning it with a solution consisting of 10% bleach diluted with nine parts water. This precaution helps prevent the spread of the disease to healthy parts of the plant.
Propagating Lifesaver Cactus
During the growing season, propagating Lifesaver Cactus is straightforward. Begin by cutting a stem piece and allowing it to dry on a paper towel. Once calloused, plant it in fresh potting soil, dusting the lower portion with rooting hormone if desired. Maintain slightly moist soil by lightly spraying with water. When new growth appears, it signals successful rooting, and you can resume regular watering. This simple process allows for easy expansion of your cactus collection.
Potting and Repotting Lifesaver Cactus
Repotting the Lifesaver Cactus is seldom necessary as it thrives in slightly crowded conditions, maintaining a tight, compact form. Typically, soil replacement every two years suffices to ensure its well-being. However, retaining the same pot is often feasible, promoting stability and minimizing disturbance to the plant’s root system. This low-maintenance approach to potting allows the Lifesaver Cactus to flourish while simplifying care for plant enthusiasts.
Common Problems of Lifesaver Cactus
Yellowing Leaves: If you notice yellow or brown leaves on your Lifesaver Cactus, it could be a sign of too much direct sunlight. To prevent leaf discoloration, consider placing the plant in partial shade or indirect light.
Drooping Leaves: Drooping leaves often indicate overwatering. To remedy this issue, allow the soil to dry out between waterings. Avoid waterlogged conditions, as they can lead to root rot and unhealthy foliage.