Growing chia plants from seeds is an enriching experience that allows you to cultivate your own superfood right at home. Whether you’re new to gardening or just exploring nutrient-dense crops, chia plants offer a low-maintenance, fast-growing option that thrives in a variety of climates. With the right conditions and care, your chia plant can flourish, offering fresh, homegrown seeds that are packed with omega-3 fatty acids, antioxidants, and essential minerals.
This guide will walk you through everything you need to know to grow chia from seeds—from preparing your soil and selecting your location to harvesting and storing the seeds. By the end, you’ll be equipped with the confidence and knowledge to grow chia successfully in your garden, backyard, or even indoors.
Understanding the Chia Plant and Its Growth Cycle
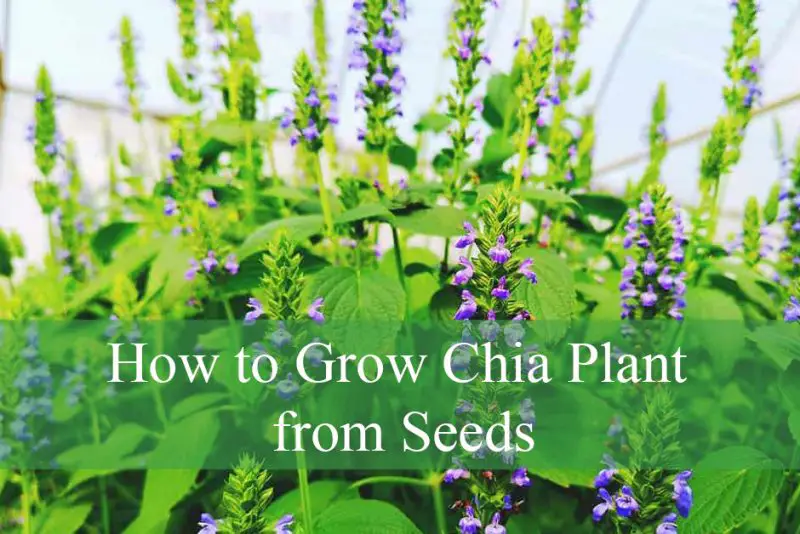
Chia, known scientifically as Salvia hispanica, is a flowering plant native to Central and Southern Mexico and Guatemala. It belongs to the mint family, and while it’s grown primarily for its seeds today, its delicate purple and white flowers also add ornamental value. Chia plants are annuals, which means they complete their life cycle in one growing season, making them ideal for beginner gardeners seeking a quick turnaround.
Chia grows best in warm climates and typically requires about 90 to 120 days from seed to harvest. The plant can reach up to three feet tall, depending on the growing conditions. Understanding its life cycle is crucial: it starts with germination, followed by vigorous vegetative growth, flowering, and finally seed production. Once the flowers dry out and the seed heads mature, you can collect the nutrient-rich chia seeds.
Choosing the Best Environment for Chia Plants
Chia thrives in well-drained soil and warm temperatures, making it ideal for regions with long summers and low humidity. Though adaptable, it does best in USDA Hardiness Zones 9 to 11. If you live in a cooler area, chia can still be grown during the warmer months as long as there’s no risk of frost. Indoor cultivation is also possible with adequate light and warmth.
The plant enjoys full sun exposure, needing at least six hours of direct sunlight daily. Choose a spot that receives uninterrupted sunlight, especially in the morning and early afternoon. If your garden tends to retain water, consider using raised beds or containers to improve drainage. Chia does not tolerate soggy roots, and waterlogged soil can easily lead to root rot and fungal problems.
Preparing the Soil for Optimal Growth
Healthy soil is the foundation of a successful chia crop. Chia prefers sandy or loamy soil with good drainage and a slightly acidic to neutral pH, ideally between 6.0 and 7.0. If your soil is heavy with clay, amend it with organic matter like compost or coarse sand to improve texture and drainage.
Before planting, loosen the soil to a depth of at least six inches using a garden fork or tiller. This allows chia’s roots to penetrate deeply and absorb nutrients efficiently. You may test the soil pH with a home kit and adjust accordingly by adding lime to raise the pH or sulfur to lower it. Incorporating a balanced organic fertilizer before sowing can also support early growth, especially in nutrient-depleted soil.
Sowing Chia Seeds the Right Way
Sowing chia seeds doesn’t require any special tools or elaborate techniques. The seeds are tiny, so care must be taken to spread them evenly over the soil surface. Direct sowing is often the easiest method. Simply scatter the seeds over the prepared bed and lightly press them into the soil, ensuring good seed-to-soil contact.
Avoid burying the seeds too deeply. Chia seeds need light to germinate, and covering them with more than a dusting of soil can hinder sprouting. After sowing, water the area gently using a misting hose or spray bottle to prevent washing away the seeds. Within a week, you should begin to see the first signs of germination if temperatures remain consistently above 65°F (18°C).
Providing Water and Nutrients for Healthy Growth
Once your chia seeds have germinated, keeping the soil consistently moist is key to helping the young seedlings establish strong roots. However, overwatering can quickly become a problem. Chia is drought-tolerant and prefers moderate watering. Allow the top inch of soil to dry out before watering again, especially once the plant matures.
Chia doesn’t require heavy fertilization. In fact, excessive nitrogen can encourage leafy growth at the expense of flower and seed production. A balanced organic fertilizer applied once or twice during the growing season is generally sufficient. Mulching around the base of the plant can help retain moisture, regulate soil temperature, and reduce weed competition.
Managing Pests and Diseases Naturally
Chia is relatively resistant to pests and diseases, one of the reasons it’s such a great crop for beginners. However, it can occasionally be affected by aphids, spider mites, and whiteflies. These pests can usually be managed with natural remedies such as neem oil or insecticidal soap. Introducing beneficial insects like ladybugs can also help control populations without harming your plants.
Fungal diseases can occur if chia is planted too densely or watered excessively. Ensuring proper spacing and good airflow around each plant helps minimize the risk. Avoid overhead watering to keep foliage dry, and remove any infected leaves promptly. Crop rotation and sanitation practices like cleaning garden tools can also reduce the spread of pathogens.
Watching for Signs of Flowering and Seed Development
About 60 to 90 days after planting, your chia plant will begin to produce delicate flowers that signal the start of the seed production phase. These blooms appear in clusters at the top of the stems and attract pollinators like bees and butterflies. Flowering typically continues for several weeks, during which time the plant will slowly begin forming seed heads.
It’s important to reduce watering slightly during this stage to prevent mold and encourage healthy seed maturation. The seed heads will eventually dry out and turn brown, a clear sign that they are ready for harvest. You may notice the plant begins to lose some of its lush green color as it redirects energy toward seed development.
Harvesting Chia Seeds at the Right Time
The best time to harvest chia seeds is when the flower heads are completely dry and start to crumble when touched. Harvesting too early can lead to underdeveloped seeds, while waiting too long may cause seed loss due to shattering. It’s best to collect the entire flower head by cutting it from the stem and placing it into a paper bag or container.
Once collected, allow the flower heads to dry further in a well-ventilated area out of direct sunlight. After a few days, you can gently crush the heads to release the seeds. Sifting the mixture through a fine mesh or screen helps separate the seeds from the chaff. Store the harvested seeds in a cool, dry place in an airtight container to maintain freshness.
Storing and Using Your Homegrown Chia Seeds
Chia seeds are remarkably shelf-stable if kept dry and sealed properly. Store them in glass jars or vacuum-sealed bags away from moisture and light. They can last up to two years in a pantry or longer if refrigerated. Before consumption, always check for any signs of mold or spoilage, especially if stored for extended periods.
You can enjoy chia seeds in many ways—from adding them to smoothies and yogurt to using them in baked goods or making chia pudding. They’re also great for hydration, as they absorb liquid and form a gel-like consistency that supports digestion. Having fresh, organic chia seeds from your own garden adds both satisfaction and nutritional value to your meals.
Growing Chia Indoors and in Containers
If you don’t have a garden or live in a colder climate, chia can still be grown indoors in containers. Use a pot with adequate drainage holes and fill it with well-draining potting mix. Place the pot near a south-facing window or under a grow light to provide sufficient light exposure. Rotate the pot regularly to ensure even growth.
Indoor chia plants require a bit more monitoring in terms of watering and temperature control. Because indoor air tends to be drier, misting may be necessary to maintain humidity. Fertilize lightly, and be mindful of pests like fungus gnats, which can appear in damp environments. With proper care, indoor chia plants can flower and produce seeds just like outdoor-grown ones.
Common Mistakes to Avoid When Growing Chia
One of the most frequent mistakes new growers make is overwatering their chia plants. While chia needs moisture to germinate, established plants prefer drier conditions. Another common issue is overcrowding, which leads to poor airflow and disease. Always provide enough space for each plant to grow and avoid planting seeds too close together.
Some gardeners also overlook the importance of light during germination. Because chia seeds need light to sprout, burying them too deep can result in poor germination rates. Finally, rushing the harvest can lead to immature seeds. Patience is crucial—wait for the seed heads to dry completely before harvesting to ensure full nutritional content and storability.
Benefits of Growing Your Own Chia Plant
Growing chia at home allows you to take full control of the cultivation process, from soil quality to harvesting methods. This results in cleaner, fresher, and often more nutrient-rich seeds than store-bought varieties. It’s also a sustainable choice, reducing reliance on commercial agriculture and long-distance transportation.
In addition to providing healthy seeds, the chia plant itself is a beautiful addition to any garden. Its elegant foliage and pollinator-friendly flowers bring life and biodiversity to your space. Whether you’re growing for health, sustainability, or curiosity, chia rewards you with both aesthetic beauty and edible benefits.
Frequently Asked Questions (FAQ)
How long does it take to grow chia plants from seeds?
Chia plants typically take between 90 to 120 days to reach full maturity from the time of sowing. The exact timeline depends on environmental factors like temperature, sunlight, and soil quality. Germination occurs quickly—usually within 5 to 10 days—followed by several weeks of vegetative growth and flowering. Once the flowers dry and the seed heads mature, the plant is ready for harvest.
Can chia be grown indoors successfully?
Yes, chia plants can be grown indoors, provided they receive enough light and proper care. A sunny windowsill with at least 6 hours of direct sunlight or a high-quality grow light will help indoor chia thrive. Indoor containers should offer excellent drainage, and the air should not be too dry. While indoor chia may not grow as tall or yield as much as outdoor plants, it can still produce seeds.
What is the best time of year to plant chia seeds?
The ideal time to plant chia seeds is in the spring or early summer when temperatures consistently stay above 60°F (15°C). Chia does not tolerate frost, so it’s essential to wait until all danger of freezing temperatures has passed. In tropical or subtropical regions, chia can be grown year-round as long as it receives adequate sunlight and warmth.
Do chia plants need a lot of water?
Chia is drought-tolerant and prefers moderate watering. During the germination stage, the soil should remain consistently moist but not soggy. Once established, the plants need far less water. Overwatering can lead to root rot and other fungal issues, so it’s better to let the topsoil dry out slightly between waterings after the seedlings are well-developed.
How can I tell when chia seeds are ready to harvest?
Chia seeds are ready for harvest when the flower heads are fully dry and begin to crumble with light pressure. The seeds inside should be hard, dark-colored, and easily separated from the flower material. If harvested too early, seeds may be immature and less nutritious. Observing a color change from green to brown in the flower head is a reliable indicator that it’s time to collect the seeds.
Will chia plants regrow after harvest?
Chia is an annual plant, meaning it completes its life cycle in one season and does not regrow from the same root system. However, if you leave some seeds in the soil, they may self-sow and germinate the following season under the right conditions. You can also collect seeds and start a new crop the next year for continuous production.
Do chia plants attract pollinators?
Yes, chia plants produce small, attractive purple or white flowers that are highly appealing to bees, butterflies, and other pollinators. Growing chia can enhance pollinator activity in your garden, making it a beneficial companion plant for other crops and flowers in your space.
Can I eat chia leaves as well?
While the seeds are the most popular and widely consumed part of the chia plant, the leaves are also edible. Chia leaves can be brewed into herbal tea and contain antioxidants and mild flavors. However, they are not commonly eaten fresh like leafy greens due to their texture and taste. Always ensure that leaves are harvested from untreated, pesticide-free plants.
Conclusion: A Rewarding Journey from Seed to Superfood
Learning how to grow chia plant from seeds offers more than just a gardening experience—it opens the door to self-reliance, healthier eating, and a deeper connection with nature. With minimal resources and care, you can enjoy the satisfaction of cultivating your own superfood and contributing to a more sustainable lifestyle.
As you continue on your chia-growing journey, remember that experimentation and observation are your best teachers. No two gardens are exactly the same, and each season brings new insights. Start small, stay attentive, and soon you’ll be harvesting handfuls of chia seeds from your thriving homegrown plants.


