Anthurium plants, also known as flamingo flowers or laceleaf, are stunning tropical plants that bring a vibrant touch to indoor and outdoor spaces. Known for their glossy, heart-shaped leaves and brightly colored spathes, anthuriums are popular among plant enthusiasts.
This guide provides comprehensive information on Anthurium Plant Care, covering everything from ideal growing conditions to propagation and troubleshooting common problems.
Understanding Anthurium Plants
Characteristics of Anthurium Plants
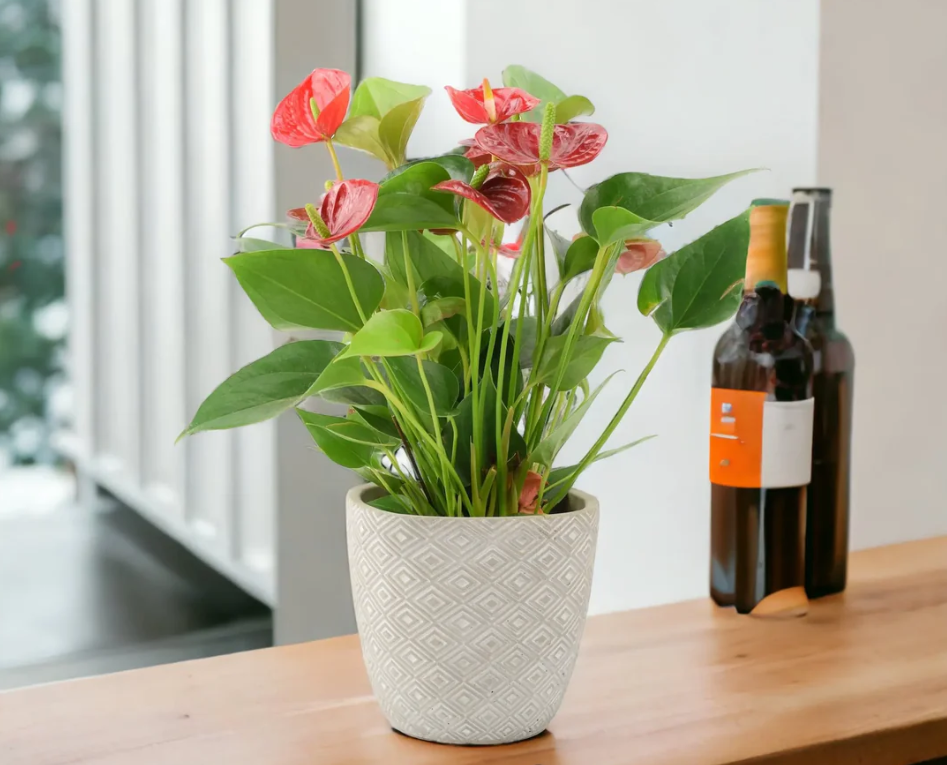
Anthuriums, often referred to as “flamingo flowers” or “laceleaf plants,” are striking tropical plants from the Araceae family. Originating from the rainforests of Central and South America, these plants have adapted to warm, humid conditions, making them excellent choices for indoor environments. Their lush, glossy foliage and unique floral structures make them highly desirable as ornamental plants.
One of the most distinctive features of Anthuriums is their waxy, heart-shaped spathes, which are often mistaken for the flower itself. These spathes come in a wide range of colors, including deep red, pink, white, purple, and even green. Their true flowers, however, are tiny and grow along the cylindrical spadix at the center of the spathe. Depending on the variety, the spadix may be straight or curved, and it often exhibits colors ranging from yellow to purple.
In addition to their striking flowers, Anthuriums are known for their thick, dark green leaves, which are often leathery and glossy. Some species, such as Anthurium clarinervium, feature prominent white veining, while others have elongated or deeply lobed foliage. These plants thrive in well-draining soil and require consistent humidity to flourish.
Overview of Anthurium Plants
- Family: Araceae
- Native Regions: Central and South America
- Foliage: Glossy, heart-shaped leaves
- Flowers: Long-lasting, waxy spathes with a central spadix
- Colors: Red, pink, white, green, and more
- Growth Habit: Can be grown as epiphytes or in soil
- Toxicity: Contains calcium oxalate, which is toxic if ingested
Popular Types of Anthurium
There are over 1,000 species of anthuriums, but some of the most common include:
- Anthurium andraeanum – The most popular variety, known for its large, vibrant spathes and dark green leaves.
- Anthurium scherzerianum – Features a curling spadix and is slightly more resilient than other varieties.
- Anthurium clarinervium – Recognized for its large, velvety, dark green leaves with prominent white veins.
- Anthurium crystallinum – Similar to clarinervium but with more delicate foliage and slightly more demanding care requirements.
Ideal Growing Conditions for Anthuriums
Light Requirements
Anthuriums grow best in bright, indirect light, mimicking the dappled sunlight they receive in their natural rainforest habitat. Direct sun exposure, especially during the afternoon, can scorch their leaves, causing brown edges and spots. If placed in too much shade, the plant may become leggy, with fewer flowers and slow growth. Indoors, an east or north-facing window is ideal, as it provides soft morning or diffused daylight. If only a south or west-facing window is available, sheer curtains can help filter the intensity of the sun. Supplemental lighting from fluorescent or LED grow lights can also be used in low-light environments. When grown outdoors, anthuriums should be positioned in a shaded or semi-shaded area, such as under a tree canopy, where they receive filtered sunlight throughout the day.
Temperature and Humidity
As tropical plants, anthuriums require consistently warm temperatures between 65-80°F (18-27°C) to thrive. They are highly sensitive to cold and should never be exposed to temperatures below 55°F (13°C), as this can lead to stunted growth, leaf discoloration, or even plant death. Sudden temperature changes, such as exposure to air conditioning vents or cold drafts from open windows, should also be avoided.
Humidity plays a crucial role in the health of anthuriums, as they naturally grow in high-humidity environments ranging from 60-80%. Low humidity can cause leaf tips to dry out and flowers to fade more quickly. In indoor settings, maintaining adequate humidity can be achieved by using a humidifier, placing multiple plants together to create a microclimate, or setting up a pebble tray filled with water beneath the plant’s pot. Regular misting can also help, but it should be done with caution to prevent water from accumulating on the leaves, which may lead to fungal issues. If humidity consistently falls below the required levels, investing in a hygrometer can help monitor and adjust conditions as needed.
Soil Requirements
The right soil mix is essential for providing proper aeration, drainage, and moisture retention. Anthuriums are epiphytic or semi-epiphytic in nature, meaning they grow on trees or rocks in the wild, rather than in dense soil. As a result, they require a light and airy growing medium that allows water to drain freely while retaining enough moisture to support healthy root growth. A well-balanced mix typically includes orchid bark, peat moss, and perlite in equal parts. Orchid bark provides structure and aeration, peat moss retains moisture, and perlite improves drainage. An alternative option is to use a pre-mixed aroid potting blend, which is specifically designed for plants like anthuriums. Adding charcoal or coconut coir can further enhance the soil’s ability to prevent excess moisture buildup and root rot.
Watering Needs
Watering anthuriums correctly is crucial for their overall health. These plants prefer soil that remains slightly moist but never waterlogged. Overwatering can lead to root rot, a common issue that can quickly kill the plant. Underwatering, on the other hand, can cause leaves to wilt and become crispy at the edges. The best way to determine when to water is by checking the top one to two inches of soil—if it feels dry to the touch, it’s time to water.
During the growing season in spring and summer, anthuriums typically require watering once or twice a week, depending on the surrounding humidity and temperature. In fall and winter, when the plant’s growth slows down, watering should be reduced to prevent excessive moisture retention in the soil. Always use room-temperature water, as cold water can shock the roots. Additionally, pots should have drainage holes to allow excess water to escape, preventing the soil from becoming soggy. If the plant is in a decorative pot without drainage, using a nursery pot inside and removing it for watering is recommended to avoid standing water at the bottom.
Fertilization for Healthy Growth
Best Fertilizers for Anthuriums
Regular fertilization is essential for maintaining the health and beauty of anthuriums, ensuring they produce lush foliage and long-lasting blooms. These plants are moderate feeders and benefit from a balanced liquid fertilizer applied every six to eight weeks. The fertilizer should be diluted to half strength to prevent overwhelming the roots with excessive nutrients.
For optimal flowering, a fertilizer with a higher phosphorus content, such as one with an NPK ratio of 10-30-10, is recommended. Phosphorus promotes flower development and enhances the vibrancy of the spathes. If the plant is primarily grown for its foliage, a more balanced fertilizer, such as 20-20-20, can also be used. Slow-release fertilizers in granular form are another option, providing nutrients gradually over time. However, liquid fertilizers allow for better control and quicker absorption.
Over-fertilization should be avoided, as it can lead to salt buildup in the soil, which may cause leaf burn and root damage. If salt accumulation occurs, flushing the soil with distilled or filtered water every few months can help remove excess minerals. During winter, when anthuriums enter a slower growth phase, fertilization should be reduced or paused to prevent unnecessary stress on the plant.
Pruning and Maintenance
How to Prune an Anthurium
Pruning is an essential part of anthurium care, helping the plant maintain a neat appearance while encouraging healthy growth. Regularly removing dead or yellowing leaves prevents the plant from wasting energy on damaged foliage. Spent flowers should also be pruned to promote continuous blooming and direct nutrients toward new growth. Any diseased or damaged parts should be trimmed immediately to prevent the spread of infections.
When pruning, always use sterilized pruning shears or scissors to avoid introducing bacteria or fungi to the plant. Make clean cuts close to the base of the affected leaf or flower stem without damaging the main stem. If the plant has become overly leggy, selective pruning of older stems can help encourage bushier growth. After pruning, it’s beneficial to monitor the plant for any signs of stress, such as drooping leaves, which may indicate over-trimming.
Cleaning the Leaves
Keeping the leaves clean is crucial for proper photosynthesis and overall plant health. Over time, dust can accumulate on the broad, glossy foliage of anthuriums, reducing their ability to absorb light efficiently. To prevent this, gently wipe the leaves with a damp, soft cloth every few weeks. This not only removes dust but also keeps the leaves looking vibrant and fresh.
When cleaning, avoid using commercial leaf shine products, as they can clog the plant’s pores, hindering respiration and moisture exchange. If the plant is heavily covered in dust, a gentle rinse under lukewarm water can help, but care should be taken to dry excess moisture from the leaf surface to prevent fungal issues. Regular cleaning also provides an opportunity to inspect the plant for pests such as spider mites or aphids, ensuring early intervention if needed.
Repotting Anthuriums
When to Repot
Anthuriums should be repotted every two to three years to refresh the soil and provide adequate space for root expansion. Signs that indicate the need for repotting include roots growing out of the drainage holes, slower growth despite proper care, or soil that has become compacted and no longer drains well. If the plant appears root-bound, meaning the roots have filled the pot and started circling the edges, repotting is necessary to prevent stress and ensure continued healthy development.
The best time to repot is during the active growing season in spring or early summer. This gives the plant ample time to adjust to its new environment and recover from any root disturbances. If repotting in colder months, extra care should be taken to avoid shocking the plant, as anthuriums are sensitive to abrupt changes.
How to Repot
When selecting a new pot, it should be only one to two inches larger in diameter than the current one. A pot that is too large can hold excess moisture, increasing the risk of root rot. Additionally, it should have proper drainage holes to prevent water from accumulating at the bottom.
To begin the repotting process, gently remove the anthurium from its existing container, taking care not to damage the delicate roots. Shake off excess soil and inspect the root system. Any dead, mushy, or rotting roots should be trimmed with sterilized scissors to promote healthy regrowth.
Prepare fresh, well-draining soil—ideally a mix of orchid bark, peat moss, and perlite—to provide the right balance of moisture retention and aeration. Place a layer of this soil at the bottom of the new pot, position the plant in the center, and fill in the remaining space with more soil, ensuring that the roots are covered but not buried too deeply. After repotting, water lightly to help settle the soil while avoiding overwatering, which could stress the plant. Keeping the plant in a warm, humid environment after repotting will aid in a smooth transition and encourage new growth.
Propagation Methods
Propagating by Division
One of the most reliable ways to propagate anthuriums is through division, which ensures that new plants inherit the same characteristics as the parent plant. This method is ideal when the plant has grown large enough to have multiple offshoots or clusters of stems.
To begin, carefully remove the anthurium from its pot and gently shake off excess soil to expose the root system. Look for natural separations in the root ball where clusters of stems and leaves emerge. Using clean, sterilized scissors or a knife, divide the plant into sections, ensuring that each new portion has a healthy root system and at least a few leaves.
Once divided, repot each section into individual containers filled with well-draining soil, such as a mix of orchid bark, peat moss, and perlite. Water lightly to help the roots settle, and keep the new plants in a warm, humid location with indirect light. Over the next few weeks, monitor them for signs of new growth, which indicates successful establishment.
Propagating from Cuttings
Another effective propagation method is using stem cuttings, which can be rooted in either water or soil. This approach works best for mature plants with long stems.
To propagate, choose a healthy stem and use sterilized pruning shears to cut a section that includes at least two nodes—small bumps along the stem where roots and leaves can develop. If propagating in water, place the cutting in a container with clean, room-temperature water, ensuring that at least one node is submerged. Change the water every few days to prevent bacterial growth.
For soil propagation, plant the cutting directly into moist, well-draining soil. Keep it in a warm, humid environment and mist the soil lightly to maintain moisture without overwatering. Roots typically develop within a few weeks, at which point the cutting can be transferred to a larger pot for continued growth.
Common Problems and Solutions
Yellowing Leaves
One of the most common issues with anthuriums is yellowing leaves, which can be caused by overwatering, poor drainage, or nutrient deficiencies. When the roots sit in water for too long, they become deprived of oxygen, leading to stress and discoloration in the foliage. To fix this, allow the top inch or two of soil to dry out before watering again. Using well-draining soil and a pot with drainage holes can help prevent excess moisture buildup. If the yellowing is due to nutrient deficiency, applying a balanced liquid fertilizer every six to eight weeks will help restore the plant’s health.
Brown Leaf Tips
Brown, crispy leaf tips are often a sign of low humidity, salt buildup in the soil, or excessive fertilizer use. Since anthuriums thrive in high humidity levels, placing them in a naturally humid environment or using a humidifier can help prevent this problem. If salt accumulation from fertilizers is suspected, flushing the soil with distilled or filtered water every few months will help remove excess minerals. Reducing the frequency of fertilization or using a diluted solution can also prevent chemical stress on the roots.
Wilting Leaves
Wilting leaves can be caused by both underwatering and overwatering, making it essential to check soil moisture before adjusting care. If the soil feels dry and crumbly, the plant needs more water. However, if the soil is constantly wet, root rot may be the issue. In cases of root rot, remove the plant from its pot, trim off any mushy or dark roots, and repot it in fresh, well-draining soil. Ensuring the plant is kept in stable temperatures and away from cold drafts can also prevent wilting due to environmental stress.
No Flowers
Anthuriums may stop blooming if they do not receive enough indirect light, proper fertilization, or if they are not mature enough. These plants require bright, filtered light to produce flowers, so placing them near an east or north-facing window will help encourage blooming. Using a phosphorus-rich fertilizer, such as one with an NPK ratio of 10-30-10, will promote flower development. If the plant is still young, patience is key, as anthuriums take time to reach maturity before consistently producing flowers.
Pest and Disease Management
Common Pests
Anthuriums can sometimes attract pests such as aphids, mealybugs, spider mites, and scale insects, which feed on the plant’s sap and weaken its overall health. Aphids typically cluster on new growth, while mealybugs appear as small, cotton-like masses on stems and leaves. Spider mites are difficult to see but leave behind fine webbing and cause speckled discoloration on the foliage. Scale insects attach themselves to stems and leaves, appearing as small, brown, or tan bumps.
To manage infestations, regularly inspect the plant and isolate it if pests are detected. Wiping leaves with a damp cloth can help remove some insects, but for more severe infestations, apply insecticidal soap or neem oil. Spraying the affected areas every few days can effectively control the pest population. For persistent problems, using a systemic insecticide may be necessary. Maintaining good air circulation and avoiding overcrowding can also help prevent infestations.
Fungal and Bacterial Diseases
Excess moisture and poor air circulation can lead to fungal and bacterial infections in anthuriums. Root rot is a common fungal issue caused by overwatering or poorly draining soil. Symptoms include blackened, mushy roots and yellowing or wilting leaves. To prevent root rot, allow the soil to dry slightly between waterings and use a well-draining potting mix. If root rot is detected, remove the affected roots, repot the plant in fresh soil, and reduce watering frequency.
Bacterial blight is another potential problem, characterized by water-soaked lesions on leaves that eventually turn brown and spread. This disease thrives in high humidity and wet conditions, making it crucial to avoid overhead watering. If bacterial blight occurs, affected leaves should be removed, and the plant should be treated with a copper-based fungicide. Increasing airflow around the plant by spacing it apart from others can help prevent bacterial and fungal diseases from developing.
Frequently Asked Questions
Are Anthuriums Toxic to Pets?
Yes, anthuriums contain calcium oxalate crystals, which can be toxic to pets and humans if ingested. Keep them out of reach of curious pets and children.
Can Anthuriums Grow Outdoors?
Yes, in USDA Zones 10-12, anthuriums can be grown outdoors in shaded, humid environments.
How Long Do Anthurium Blooms Last?
Anthurium flowers can last 6-8 weeks and rebloom multiple times a year with proper care.
Conclusion
Successfully growing anthuriums involves maintaining the right balance of light, humidity, and watering. These tropical plants flourish when given bright, indirect light, well-draining soil, and consistent moisture without being overwatered. Regular maintenance, such as pruning, repotting, and pest management, further ensures their long-term health.
With proper care, anthuriums will reward you with their stunning, waxy blooms that last for weeks. Their striking foliage and elegant flowers make them a beautiful addition to any indoor space or shaded outdoor garden. By following the tips outlined in this guide, you can cultivate a thriving anthurium that continues to bring beauty and vibrancy to your home.


Having great difficulty trying to communicate with your business!
Support@ownystd life doesn’t work!! Keep getting “invalid email.
Fell in love with the “cat eyes” plants & would like to order some!
Marilyn Lane
mmmlane@verizon.net